

This photo was taken in my Lianzhou, China journey.
Silhouettes give people a mysterious feel.
Wanna reveal their mask?
Take a photograph of silhouettes like that is not an easy task.
What?
Please count how many legs in the photo?
What happens if one or more legs overlapped? If a silhouette's legs overlap, they will melt into one piece.
Now, do you see the trick?
I needed to take a photo in which all the 10 legs are seperated.
It is a issue of timing.
A machine gun (high speed shooting) is a great help.
I continuously shot 50 photos to get one that all legs are clearly seperated.
Photography requires your patience and tricks!
Tuesday, April 1, 2008
Use a Machine Gun to Shoot Silhouettes
Monday, March 31, 2008
Step on Cloud

This was my first time seeing this kind of fishing method in my Yangjiang, China trip in 2005.
The fishmen put a extremely long net into the sea before dawn.
More than 20 fishmen pull the net back to the seashore when the first twilight reached the ground.
The scene was not as beautiful as you see now.
I drew a new scene based on what I saw in my mind. 
Having what I needed in my head, it was not the time to press the shutter button, but to organize objects I were going to shoot.
I made the net look like a "S" shape instead of spaghetti.
Someone may argue we should not manipulate what we see.
I agree if it is used for documentary.
A photographer is also an artist if she/he treats photography as a visual art.
Re-organization and creation is part of an art.
It requires a photographer to have a sense of art.
I always ask people to take beautiful photos of sky, sea or tree.
Those photos become your photo library.
Then you can find the required components from your library.
The above photo of sky is taken from my photo library.
You might retort components such as the sky, the sea etc can be found in Internet.
As a photographer or visual artist, the originality of works is a must.
If you mix others' works into your own work, who is the original artist?
Now, I put the cloud photo and fishmen photo in 2 layers as shown above.
The cloud photo is used for the reflection on the seashore.
Please refer to the next photo.
Note:
The layer mode of fishmen layer is hard light.
I cut the top part of the cloud photo because it is something else, but it won't affect the output because it is the area of sky. I will give the fishmen photo a more beautiful sky later.
This is what we see when I put the cloud and fishmen photo in 2 layers and set the fishmen photo's layer mode to hard light.
Now, I found a suitable sky from my photo library.
Again, do you see how important is a photo library?
Please do create one for yourself now!
The lower part of the sky photo is something else, so I cut it.
It does not matter because it is enough to cover the sky of the fishmen photo.
There are the arrangement of the 3 layers.
The top layer is the sky. The middle layer is the fishmen. The bottom layer is the cloud.
I put a layer mask for the sky layer because the sky photo overlaps the sea of the fishmen photo, so I used a layer mask to hide the extra lower portion of sky.
The is the outcome after applying a layer mask for the sky layer.
As usual, the last step is to adjust the contrast because people in digital world love rich colors.
Do NOT just press the shutter button.
Please also try to design and draw your own picture while shooting photos.
Saturday, March 29, 2008
Props and Props

One of the best ways to make your portrait photos more interesting is the use of props.
A lamp earns quite a lot marks in the above photo.
Do you agree?
The garland directs your focus on the girl's head.
The girl is playing with flowers. This gives the content to the photo.
Even a plastic or paper butterfly can colorize your photo.
Prepare props for your next photo trip!
See if there is any difference in your next photo!
Wednesday, March 26, 2008
Lonely

Sometimes, we feel lonely,
but loneliness reminds us to treasure our friends.
Photographic technique:
A black and white photo makes people concentrate on shape and lighting.
It prevents people from distracting by colors.
If you want to emphasize shapes or patterns, with the help of good lighting, a black and white photo is a good choice.
Tuesday, March 25, 2008
Travel with a Lomo

Those photos were taken in my trip to Daocheng in China.
It was a very nice place because no vehicles can reach there.
Everything is unpolluted.
Why the colors of the photos are so weired?
Coz the film was developed in a E-to-C process.
It was the starting point of my trip.
When there are a strong tunneling effect on the photo?
It is one of the charactistics of a lomography camera.
The one I was using is LC-A.
We were 4659m from the sea level as you can see from the sign.
Freezing cold and icy.
Everywhere was full of reglious atmosphere.
A very colorful place.
Does lomography give you a different world?
Hint:
If you want to have a blue tone in your lomo, Agfa CT-100 is a good choice.
But it is very difficult to find a roll now.
Monday, March 24, 2008
Essence

Who knows what it is?
It's a 5 1/2" floppy disk which has 1.2MB capacity.
Are you kidding?
An average digital photo file size is 2-3MB.
An average MP3 file size is 4-5MB.
What a 1.2MB floppy disk can do?
it has been used to store games such as Street Fighters.
It has been used to store an operating system.
It has been used to store a photo editor.
There are a lot more!
Though our storage size is much larger now, we tend to waste even much more space.
If we erase most of the rubbish from our blog, our whole life's diary can be condensed into a floppy disk.
Extract the essence from your blog!
They are the most colorful pages of your life!
Saturday, March 22, 2008
Monsters' Hands

It was a peaceful day.
I was walking in an island.
I kept walking and without noticing it was already dusk.
Suddenly I saw many gaunt monsters' hands climbing out of earth.
They were seeking help.
They were trying to touch the sky.
Who made them suffered?
Who will give them a hand?
Portrait: One lighting

The basic principle to learn lighting is step by step.
Please start with one light first.
Single source of lighting can give very good results too.
Here are some examples:
Single lighting comes from right
Single lighting comes from left
Go and Play with a single light source!
Thursday, March 20, 2008
Flying Eggs

Easter is coming. I make eggs flying now.
Retouched by Photoshop? No.
The flying effect is absolutely not done by Photoshop.
The above photo was taken in 1 shot.
I think you are smart enough to figure out how it was done.
Go and make your Easter eggs flying over now!
Wednesday, March 19, 2008
Turn Spring into Autumn for Pandas

The cute panda photograph was taken in my trip to Daocheng China 3 years ago.
I found an Autumn background looks nicer than a green one, so I changed it to orange.
This is the original photo.
The panda is still very cute.
Here are the magic to change the season:
1) Load the original photo into Adobe Photoshop
2) Go to the layer window
3) Click on the "Create new fill or adjustment layer" icon under the background layer
4) Select "Hue/Saturation..."
5) Move the hue slidebar until leaves become orange, but the panda turned red too
6) Go back to the adjustment layer
7) Click on the layer mask thumbnail (next to the Hue/Saturation adjustment icon)
8) Press "D" to set foreground to black and background to white
9) Press "B" to select the brush tool
10) Use +/- to enlarge or reduce brush size
11) On top of the Photoshop window, adjust the flow value to about 8% to 15%
12) Paint the panda and branch with the brush
13) The panda's color is changing back to natural now
14) Continue until the whole panda and branches' colors are right
You are a Season Wizard now!
Tuesday, March 18, 2008
Frame Your Photos

When you use something as frames for your objects, it could turn a ordinary photo into a special one.
I used a ligh bulb as a frame for the yacht. Isn't it more attractive now?
Try to use natural frames in your next trip!
Part of the dirty green glass was cleanred. It created a natural frame.
I shot through the cleaned area.
Windows of a door framed my friend.
It looks more wonderful with the existence of the "frame".
Sunday, March 16, 2008
Bubble Lens - Doughnut Trip

What is a Bubble Lens? It is actually a reflection lens.
A reflection lens turns out-focused bright dots into doughnuts or bubbles, so I called it the Bubble Lens or Doughnut Lens. The effect is like dreaming!
Photos of this article were taken during my first trip in 2008.
I deliberately made some of them out-focused or motion-blurred while taking the photos.
The branches was out-focused and became doughnuts. Yummy! Yummy!
If you look through a Doughnut Lens, you can easily find tons of sweet doughnuts in water.
Many golden doughnuts
I moved my camera vertically while taking photos of the trees.
Don't you think it gives you more imagination and a mysterious feeling?
Try a Bubble lens and eating doughnuts in your dream!
Friday, March 14, 2008
Portrait: 3/4 Train Platform

One day, one of my friends asked me why I bought my own camera.
"Taking photos for girls." I answered him honestly.
Although I also take photos of sceneries, plants, animals etc, I still love portrait most.
Why? Coz taking portrait photos is an interaction process.
To take a good portrait photos, I need to make joke and communicate with people I am going to take pictures for.
To make them relax, to let them feel natual and present my concept to them.
It is simply an art!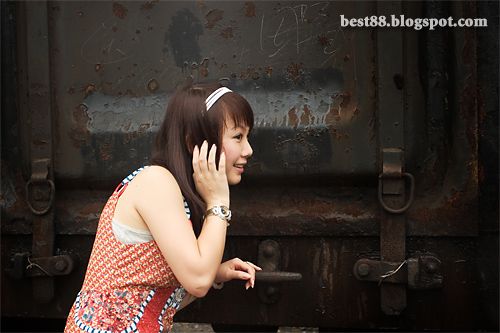
If you are a photographer, you need to remember some good poses and apply them to your models or friends.
If you like being a model, you have to observe poses of other models in magazines or music videos.
Your photos must look more interesting than your "stand straight and shoot" photos.
Thursday, March 13, 2008
Paint Clouds for Magic Hour
I love sunset. Love the color change.
Changing from yellow to orange, to purple, to pink, to red.
So lovely!
The color change lasts for about an hour and people call it the Magic Hour.
Seeing sunset becomes one of my favourite habit especially with my girlfriend.
"When will we have our 1000th sunest seeing?" I asked her one day.
A wonderful dawn should have bravo clouds to demostrate momentum.
But, it is not always the case.
So, please take every chance to take pictures for different patterns of clouds.
Those clouds could be your widgets, components or ingredients during photo retouching.
If you want to be a professional photographer, please always put a camera in your bag!
Now I am going to show you how to put clouds for dawn.
1) As usual, open your Adobe Photoshop
2) Open your favourite photo which lacks clouds
3) Open your cloud photo
4) Put your cloud on a layer above your scenery
5) Press the ALT key while clicking on the mask icon
6) A black rectangle appears on the cloud layer
7) Press "B" or click on the brush icon to select the brush
8) Use + or - key to enlarge or reduce brush size
9) On top of the Photoshop window, adjust the flow value to about 8 to 15%
10) Press "D" to set the foreground color to black and background to white
11) Then press "X" to swap foreground and background colors
12) The foreground should be white now (if not, please "X" again)
13) Gently paint the empty sky
14) Wow! The clouds come out now!
Note:
If you paint anything wrong, you can press "X" to exchange the foreground and background colors.
Now the foreground should be black. If not, press "X" one more time.
Then paint on the area where you want to wash away the clouds.
Trick:
Paint gently near boundaries to let clouds gradually merge into the background
Go and take some photos and do this exercise!
Wednesday, March 12, 2008
When Day meets Night
In the picture below, The sun was there, but all light pods of the bridge was on.
How do we put day and night together?
I have made use of a photographic technique called double exposure.
Please prepare the following ingredients for the magic first:
1) Set up a tripod and put your camera on to it
Please prepare the following ingredients for the magic first:
1) Set up a tripod and put your camera on to it
2) Shoot, shoot, shoot and shoot in day time or sunset, but do NOT move your camera

3) Continue to shoot or wait until night comes without moving your camera
4) Take some photos for the beautiful night scene, but keep your camera in the same position


Then... it's time to do dark magic which is Adobe Photoshop.
5) Open your Photoshop
6) Open one of your daytime photos
7) Open another photo which was taken during night time
8) Go back to the daytime photo and place your night-time photo on a new layer
8) Go back to the daytime photo and place your night-time photo on a new layer
9) Now the first layer is your daytime photo and the second layer is your night-time photo
10) Change the mode to "Lighten"

11) Adjust the Contrast, Colors and Level if required

12) Yeah! Here you go!
Where are those wonderful clouds?
In next lesson, I will teach you how to put clouds into the photo to make the magic hour prettier.
As you can see, double exposure can turn your dull photos into fantastic pictures.
Go and practice now!
As you can see, double exposure can turn your dull photos into fantastic pictures.
Go and practice now!
Subscribe to:
Posts (Atom)


